A Guide To Start Your Real Estate Photography
Photography had never been that important in selling the real
estate than today. The marketplace is heating up again and is demanding for the
real estate makes demand for photography. It is the best news for
photographers, however, just like any other businesses, there are plenty of
competitions.

If you are just new to the real estate and the architectural
photography, then, here are the general strategies to let you begin you on the perfect
path:
Approaching the Property – this is the first image that the
possible buyer normally sees when reviewing the properties online is the
exterior photo.
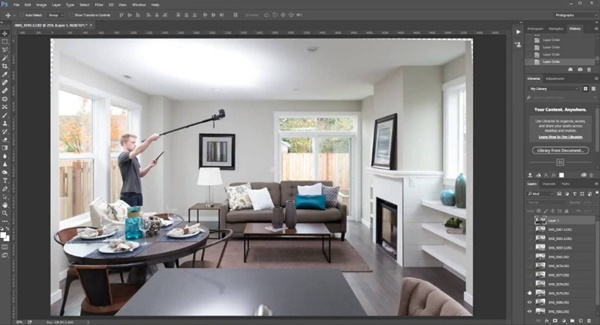
Camera Equipment – the camera, lens, and the tripod, are everything
that is needed to get started, however, you can rapidly learn that lots of competitors
are very expert in using supplemental lightings and the Photoshop techniques.
Camera Vertical Edges and Height – there has been a broad
agreement among the photographers and the clients, that if there will be any
rule to implement, then, it must be stated before the contract signing:
verticals should be correct! In lots of interiors there are corners and edges
of walls, windows and door frames that has the vertical side and the edges
needs to be really vertical.
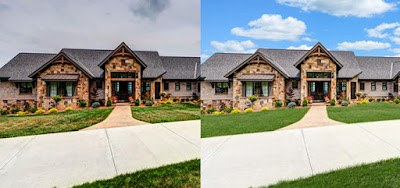
Exterior Lighting – the light hitting the front line of the
house home is ideal being seen after sunrise.
While during winter, some houses facing
south did never have a sun hitting in the Frontline of their houses. If you
want to avoid shooting under the sun, then photo shoots from the similar end of
the home as the sun.
Getting Good Exposure – during the overcast day, an interior
exposure seemed to be good and also the window exposure. The flash will be
bounced off the ceiling. To be sure that you will have all that exposures for
the best image, determine the ‘base exposure’, the picture that had most of the
information cored in the histogram. It can be bracketed widely within +/- of one
stop increment of the different exposures so that there can be array just in
case you will need them.

Interior Lighting – just the same with the finely lit
portrait, the interiors will greatly benefit from the nicely styled lighting.
The HDR will handle the scene contrast, but this will not make the highlights
and the shadows in the areas that there are no directional light. When there is
a dark or a black
cabinet alongside the dark wall, just add supplemental light
may bring out the needed detail.
Interior Photography – the houses come in all sizes, styles,
shapes, and conditions. It is always nice to tell your real estate clients that
you are not in the business of house cleaning, so send them the task list with
your suggestions on prepping their house prior to the photography session.
The dark/dusk technique – this dark or dusk technique is usually
requested by the clients since it helps to sell the properties.
The master bathroom – it is usually the initial test shot that
will be taken and then flow with go through the entire house.

Thanks for sharing such a wonderful article. Hope to read more such article on
ReplyDeletePhoto Editing Services USA
Photo Retouching Services USA
Real Estate Photo Retouching Services USA
Product Photo Editing Services Canada
Clipping Path Services USA
Background Removal Services USA
Skin Retouching Services USA
Thanks for sharing such a wonderful article. Hope to read more such article on
ReplyDeleteDigital Marketing Services In Dubai
Website Design and Development Duabi
SEO Agency in Dubai
Digital Marketing Agency In Dubai
eCommerce Website Designing in Dubai